Workflow Configuration Displays Error Icon despite being valid

13 02 2018

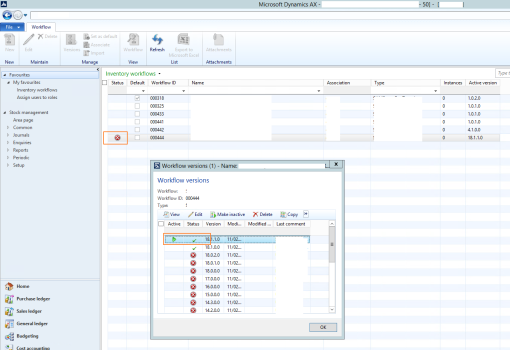
I’ve recently found a scenario where my workflow configuration has an “invalid” icon next to the workflow configuration, this all despite the latest version being fully validated.

unnamed.png

Tracing back the issue it seems that Microsoft displays the “valid/invalid” icon based on the latest workflow version sorted by workflow version “RecId” (See Table: WorkflowTable.validIcon).

So searching the workflow version Table I found an old invalid workflow configuration version (based on modifiedDateTime) that has an out of sync (i.e. newer) RecId than the actual newest versions. Deleting this record resolved the issue.

There should be no issues deleting this invalid version as actual workflow instances can’t be created against invalid versions.

I think the way the icons are displayed is a bug in AX, but so far doesn’t appear to affect too much.


JSON in Dynamics AX – Advanced example #1 (Basic Auth)

11 11 2013

After my previous post on using JSON in Dynamics AX2012 I have received a number of requests for some slightly more advanced examples. I will attempt over the next couple of weeks to provide some.

Today I will cover the use of Basic http authentication. There are a couple of non-intuitive tricks that one needs to use to get it to work.
Before performing any direct requests as per our previous example you will need to make some modifications to the headers in your RetailRequestWeb object.

The first header modification is to add the “Authorization: Basic ” header. You can do so by building up the header string as follows

System.Text.Encoding ascii;
str credentials;
credentials = "myusername:mypassword";
//N.B. Encode the credentials before adding them to your headers otherwise you will receive 403 unauthorized errors
ascii = System.Text.Encoding::get_ASCII();
credentials = System.Convert::ToBase64String(ascii.GetBytes(credentials));
//Combine header instruction and encoded credentials
request.parmHeader("Authorization: Basic "+credentials);

The second modification you need to make is set the request content type to “application/json” without this you may receive 403 unauthorized errors. The retails API allows you to set the content type easily by using the parmContentType method on your RetailRequestWeb object.

request.parmContentType("application/json");

Finally the full example of constructing your json request ready for use:

RetailWebRequest request;
System.Text.Encoding ascii;
str credentials;

request = RetailWebRequest::newUrl(_url);
credentials = "myusername:mypassword";
ascii = System.Text.Encoding::get_ASCII();
credentials = System.Convert::ToBase64String(ascii.GetBytes(credentials));
request.parmHeader("Authorization: Basic "+credentials);
request.parmContentType("application/json");


Using JSON in Dynamics AX

22 10 2013

I’ve recently had a requirement to integrate an external system (Toggl http://www.toggl.com) with Dynamics AX 2012’s Timesheet system. However the external system only provided a JSON API which isn’t supported natively by the Dynamics AX AIF system.  After some research and trial and error (using various DLL’s) I eventually stumbled across some really useful classes provided by the Retail module in Dynamics AX2012. These classes (although named “Retail…”) provide a really easy and elegant JSON interaction for any use. Here is a very basic code sample of how to consume JSON using these classes in Dynamics AX 2012.


static void myJob(Args _args)
{ 
    RetailWebRequest request; 
    RetailWebResponse response; 
    str rawResponse, value; 
    Map data; 
    RetailCommonWebAPI webApi = RetailCommonWebAPI::construct(); 
    request = RetailWebRequest::newUrl("http://mysite.com/jsonaction"); 
    response = webApi.getResponse(request); 
    rawResponse = response.parmData(); 
    data = RetailCommonWebAPI::getMapFromJsonString(rawResponse); 
    value = data.lookup("elementname"); 
    info(strFmt("Element name: %1",value)); 
}

If you are interested in some more advanced examples of using JSON in AX (e.g. using authentication, retrieving subsets of info or arrays)  or doing some of your own integration into Toggl timekeeping please let me know and I’ll post some more info.


Customize your AX Workflow Email Templates

12 12 2012

A number of our clients have made requests of us to provide more meaningful information available on the Email notifications that are sent to the workflow work-item assignees. The typical information that they would like to see is line item information for workflow relating to Purchase Requisitions etc.

The easiest way is to modify the various task and step instructions in your workflow configuration. You can select tags relating to the lines such as %Purchase Requisition.Purchase requisition lines.ItemId% etc. These instructions can be displayed in your workflow email notification by including the %message% tag in your email template.

Screen Shot 2012-12-12 at 10.11.38 AM

However using this approach is not very flexible or visually appealing as each tag is replaced by a comma separated list of the values from the various lines. Most of our clients have required a more tabular format for the lines. My approach to solving their issue is by using a code based solution that I will describe below.

I’d like to say at the outset that the disadvantages to this approach is that it doesn’t easily allow for multi-language, its fairly rigid, and it is a more hard-coded solution making it not very flexible.

Step 1. Create a method ‘wfDescription’.

Create a ‘wfDescription’ method on each Workflow Document table that you are using. This method should return an block of html (or plain text) with the content that you would like to display for the given document type. E.G. For a purchase requisition add the following method to the PurchReqTable table.

str wfDescription() 
{
 PurchReqLine line;
 str ret="";
 ;
 ret = ret + strfmt("<strong>Motivation: </strong>%1<br/>", this.businessJustification()); ret = ret + "<strong>Lines:</strong><br/>";
 while select line where line.PurchReqId==this.PurchReqId
 {
   ret = ret + strfmt("%1. %2 <span style='color: #009966'> (%3 @ %4 %5) - %6</span><br/>",num2str(line.LineNum,0,0,1,3), line.itemName(), line.PurchQty, line.CurrencyCode, line.PurchPrice, line.LedgerAccount);
 }
 return ret;
}

Step 2: Add a description tag to your email template

Open up your email template and place a %documentdescription% tag in the place where you would like the text/html block from Step 1 to appear in your emails.

Step 3: Enable the %documentdescription% tage

This is the key step in the whole process. To enable workflow to replace the new %documentdescription% tag created in Step2 with the contents from the method in Step 1. To do this we will be customizing the ‘EventNotificationWorkflow’ class:

  • Open the ‘EventNotificationWorkflow’ class.
  • Edit the sendMail method.
  • Add the line ‘this.addCustomMergeValues();’ after the line ‘this.addBaseMergeValues();’
  • Create a new method named ‘private void addCustomMergeValues()’ to the ‘EventNotificationWorkflow’ class.
    This method will determine whether the workflow document has the ‘wfDescription’ method and will replace the tag with what the method returns.
private void addCustomMergeValues2()
{
  SysDictTable dictTable; 
  str description;
  ;
  dictTable = new SysDictTable(tablenum(PurchReqTable));

  if (dictTable.isMethodActual('wfDescription'))
  {
     description = dictTable.callObject('wfDescription',record);
  }
  else
  {
    description = "";
  }
  mergeValues.insert("documentdescription", description);
}

The final step is to prevent the html from your return method from being escaped. To do so:

  • Open up the SysEmailTable (Table) in the AOT
  • edit the HTMLEncodeParameters method
  • Add a conditional statement before the line ‘encodedMap.insert(mapEnum.currentKey(), SysEmailTable::htmlEncode(mapEnum.currentValue()));’ so that your new tag %documentdescription% is not html encoded.
if (mapEnum.currentKey() == 'documentdescription')
    encodedMap.insert(mapEnum.currentKey(), mapEnum.currentValue());
else 
    encodedMap.insert(mapEnum.currentKey(), SysEmailTable::htmlEncode(mapEnum.currentValue()));

If all goes well you should now receive more detailed information in your email notification.
Let me know if you have any better ways of accomplishing this or comments on my solution.

Happy daxing.


Cumulative Rollup 3

17 07 2012

For all of those out there who don’t yet know this, CU3 for Dynamics AX 2012 has been released with a number of hotfixes that fix various workflow issues. The majority of the issues seem to center around specific workflow types in CRM, AP Invoicing, AP and Purchase Requisitions.

However there are some fixes with the framework including a fix to an issue that forced the workflow execution account to be in en-us language and a fix for workflows submitted in companies that are not the default for the workflow batch job.

You can access the Update and knowledge base article here: https://mbs2.microsoft.com/Knowledgebase/KBDisplay.aspx?scid=kb;EN-US;2709934 (Partnersource login required)


X++ Exception: Workitem could not be created.

2 05 2012

I have been doing some tests with a new custom workflow and came across the following scenario. (Note: this describes a solution to one of the many issues that may cause this error message)

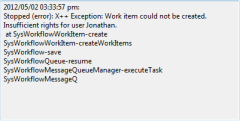
I developed a custom workflow and its setup its corresponding configuration, I was able to submit and everything but ended up getting the following error in my workflow history when the workflow system tried to assign a workitem to me:

Stopped (error): X++ Exception: Work item could not be created. 
Insufficient rights for user Jonathan.
 at SysWorkflowWorkItem-create 
SysWorkflowWorkItem-createWorkItems 
SysWorkflow-save SysWorkflowQueue-resume 
SysWorkflowMessageQueueManager-executeTask 
SysWorkflowMessageQ

After exploring for a while I found an additional line on my batch server’s event log stating “X++ Exception: The workflow system could not access the business document data. Report this issue to your system administrator.” which once can trace back to line 68 of the SysWorkflowDocument.assertAsUser method.

I reviewed the query linked to my workflow document of my custom template and realized that one of the links or ranges caused no records to be returned, ever. Fixing the query and resuming my workflow caused the workitem to process correctly.

Unfortunately this error message was a bit cryptic for the actual issue at hand, but I hope this will help someone who runs into the same issue in the future.


Workflow threw an exception for the following reason: Class MyDocumentClass cannot be instantiated.

2 05 2012

I’ve been battling trying to get one of my new AX2012 workflows to function properly. Whenever one tries to create a configuration against the template the info dialog says “An unexpected error has occurred while opening the workflow. See the event log on the AOS and contact your system administrator to resolve the issue.” Reviewing the event log gives the error “Workflow threw an exception for the following reason: Class MyWorkflowTypeDocument cannot be instantiated.

Resolving the issue required me to make use of the “Generate Full CIL” function in the AX developer workspace. Located on the toolbar to the right of the AOT button. Initially this didn’t help as some other classes or tables (still in development) didn’t compile (even unrelated to workflow). After removing these offending classes and tables and regenerating the CIL I was able to create a new workflow configuration


WorkitemsCreatedEventHandler Property

17 04 2012


I’m very happy to see that in AX2012 there is now a “WorkitemsCreatedEventHandler” property added to approval and task nodes in the AOT. I’m looking forward to using this to do special notifications to users when they are assigned workitems.

This was near the top of my workflow wishlist for 2012. Thanks Microsoft!


Adding code templates/shortcuts in AX 2012

19 03 2012

If you’ve got any blocks of code that you use frequently, e.g. specific comment blocks, you can very easily add code short cuts in AX 2012 to auto-insert the them in to your X++ code.

For example you can setup AX to automatically create surrounding comment such as

whenever you type “mycom” and press the tab key.

How do you accomplish this. Very easily!

Step1: Locate the class EditorScripts in the AOT.
Step2: Create a new method with the format public void template_flow_[shortcut](Editor editor)
Step3: User the editor parameter to add code the code that you would like inserted. e.g. editor.insertLines(“\\test comment”);
Step4: Add your method to the case statement in the isApplicableMethod method in the section relating to template “editor scripts that does not apply to Macros” 

Thats it, now if you type your shortcut into any editor in AX and press tab, the “\\test comment” code will be inserted.

Here’s a full example method

The above creates the following output:


Code upgrade whitepapers for AX 2012

23 02 2012

For those of you upgrading AX 2009 code to AX2012, Microsoft has provided an impressive set of upgrade white papers describing the changes in the various functional areas of AX. Practical examples of how you as a developer can adapt your code to fit in with the new way of doing things are provided at every turn.

These papers include how to adapt to changes to the Inventory Dimensions, InventTrans Table, Eventing functionality, Addressbook framework, budget control (commitment accounting framework) etc..
These are all a must read before starting upgrade projects.

You can download all the papers over here. http://technet.microsoft.com/en-us/Library/hh272866.aspx