Assign Workitems based on document field

28 11 2012

I received a query yesterday from a reader asking how one could go about assigning approval work items to different users based on specific fields in the source document. There are a couple of approaches that you could use. The first approach that I will discuss today is ideal to use in the following circumstances.

  1. You do not wish to perform any development.
  2. There are not too many combinations available. E.G. Assign all blanket Purchase orders to person X and all the rest to person Y.

If you are using AX 2012, you can do the following:

  1. Create a new workflow configuration from whichever template you are basing your workflow configuration off.
  2. Drag and drop a conditional decision node into your workflow configuration to split your workflow into multiple paths.
  3. Configure your conditional decision by clicking properties. Then setup a condition E.G. Where Ledger Journal Table.Account Type is value Ledger
  4. Close the conditional decision properties.
  5. Drag and drop two of your approval/task nodes to the workflow structure.
  6. Connect the true side of your conditional statement to the one and the false side to the other.
  7. Configure your approval nodes.
    1. Double click on the node connected to your True leg of the conditional statement select Step 1, click the assignment button.
    2. Select “User” under the “Assignment Type” tab.
    3. Select the User / Users who should be assigned the workitem if your condition is met.
    4. Setup your workflow messages for the step.
    5. Return to your workflow canvas and perform step 1-4 for the false leg of your conditional decision, selecting the relevant user to whom the workitem should be sent to if the conditional decision is not met.
  8. Should you have more than two options, you can chain multiple conditional decisions to either the true or false leg of your original decision.

Here is a short video tutorial for the above making use of AX2012 and the Vendor Disbursement Journal Workflow. I’d recommend watching it in HD.

As an alternate to the above approach, or if you are using AX2009, you can also make use of multiple steps within a single approval. (This example is using AX2012, but a similar path is followed with AX2009)

  1. Create a workflow configuration with an approval node.
  2. Double click on your approval node
  3. Click on Step1, click the Condition button.
  4. Select the “Run this step only when the following conditions are met.”
  5. Create a condition.
  6. Select the Assignment option on the left of your screen.
  7. Select “User” on Assignment type
  8. Select the User / Users who should be assigned the workitem if your condition is met.
  9. Close Step1’s properties.
  10. Drag and drop a new step from your tool box into the process flow and repeat step 1-9 for each of the conditions required.
  11. Ensure that all possibilities are met.

Here is a short video tutorial for the above making use of AX2012 and the Vendor Disbursement Journal Workflow  I’d recommend watching it in HD.


AX2012 Purchase Order Workflow Training Video

13 11 2012

I recently came across the following very helpful video from Microsoft’s information source website relating to the “Approval Process for Purchase Orders”

It provides a nice overview of the capabilities of the Purchase Order approval process in Microsoft Dynamics AX 2012 for both line level and header level approval. The narrator takes you through the Purchase order state model and explains details behind each status that the Purchase order goes through and what actions are available to users at each point.

Mention is made of the various budget and encumbrance controls available to users as well as the versioning system for Purchase Orders.

You can view it at Microsoft’s information source website by with this link or by clicking on Library, Microsoft Dynamics AX2012, Search for “Approval Process for Purchase Orders.


Setup User workflow email notifications in AX2012

23 08 2012

In order for users to be notified of new work-items that have been assigned to them you will need to ensure that they have their notification settings enabled. To do this you can follow the following procedure.

  • Navigate to the user options screen.
    • If this is for yourself, you can locate user options from the File -> Tools -> Options menu.
    • If this is for other users you can access the form via System Administration -> Common -> Users -> Select the correct user -> Click options on the toolbar
  • Select the notifications tab
  • Check the “Send notifications in email” checkbox. By default this is disabled.

N.B. Please ensure that you your email templates and outgoing mail server have also been configured and in AX.


Organisation-wide Workflow Email Templates

22 08 2012

If you make use of organisation wide workflow configurations in AX2012 you may have come across an issue where users are not notified of their new work-items via Email.

To set this up you will need to:

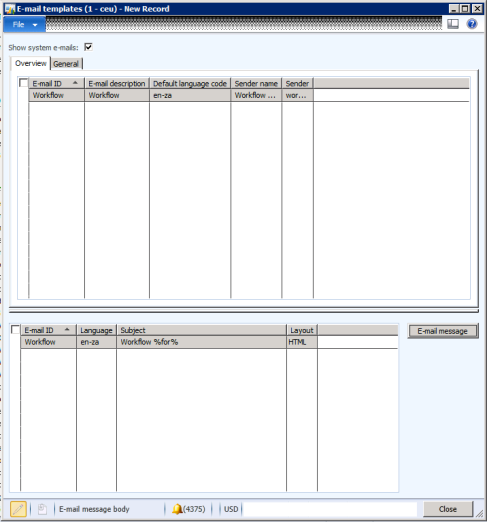
1. Navigate to your email templates under the Setup menu of “Organisation Administration”.
2. Select the “Show system email templates”
3. Create a new Email template.

Image

4. Navigate to “System Administration” -> “Setup” -> “Workflow Parameters” and select your newly created email template. (For company specific configuration AX looks at the template selected under “Organisation Administration” -> Setup -> Workflow Parameters)

Your users should now be notified of “Organisation-wide” workflow workitems.


Installation and Configuration

15 05 2012

I’ve just completed reading through the installation and configuration manual for AX2012 and came across chapter 5 on workflow. This chapter is a must read for anyone starting out in workflow on Microsoft Dynamics AX2012. It covers/explains all the topics that one needs to know about workflow (apart from the development side) including:

  1. Descriptions of all the available workflow types (previously templates) from the following modules
    1. Accounts Payable (Invoiceing, payments, remittance etc..)
    2. Accounts Recievable (Journals, Free text invoices, customer payments etc…)
    3. General Ledger and Fixed Asset workflows
    4. Budgeting
    5. Travel and Expense (Cash advance, expense report, travel, dispute management etc…)
    6. Procurement and Sourcing (Catalogs, Purchase requisitions, Purchase Orders, Vendor modifications etc…)
    7. Project Management and Accounting
    8. User management
    9. Organisation workflows.
  2. Configuring the workflow environment
    1. Email templates (both generic and configuration specific templates)
    2. Batch Job setups
    3. Notification setups
    4. Workflow queue setups
    5. Explanation of the workflow infrastructure and how all the components interact with each other.
  3. Creating configurations
    1. Line level workflows
    2. Conditional and manual decisions
    3. The graphical workflow configuration utility
    4. Workitem assignments (queues, hierarchies, workflow users, workflow roles)
    5. Approval policies
    6. Versioning.

All in all this manual is well worth the read for first time users.

Happy Daxing

Download at partnersource: https://mbs.microsoft.com/partnersource/communities/training/trainingmaterials/student/course80221.htm?printpage=false


Setting up notifications on Approvals

11 04 2012

Yesterday i received a query from a client on how to setup a notification so that the person who submits a document to workflow gets notified once it had been approved. I quickly recorded the following screencast. I recommend watching it in high quality otherwise everything is a bit small.


Cancel Workflow – The Process

1 02 2012

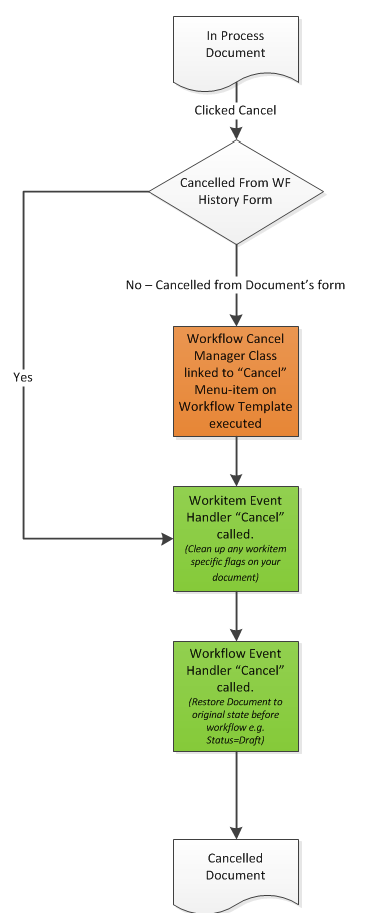
I always think better with diagrams, so I quickly drew up this diagram on when code gets executed after a user has clicked the “Cancel” button on either the workflow history form or the document’s (e.g. PurchReq) form. This helps me to know how to clean up my document on cancellation, by placing the code in the correct place.

Process that occurs when workflow is cancelled

Cancel Workflow Process

Look out for a more detailed document on the rest of workflow in the next few weeks.


Security Keys for Workflow History

22 12 2010

I’ve recently been working on a client site setting up security in Dynamics AX workflow and the question of access to the workflow history form (accessed via yellow workflow bar) as well as the re-assign, resume and cancel buttons on that form was raised. After a few minutes investigation I found them under the SecurityKey BasicMisc.

Remember that turning off access to workflow history via the security key will remove the Workflow History button from Basic -> Enquiries as well as from your Yellow Workflow Bar

Summarised: (Label, Key)
“View History” – > WorkflowViewHistory (key)
“Resume” -> WorkflowStatusResume (key)
“Reassign” -> WorkflowStatusReassignWorkItem (key)


How to run multiple Dyanamics AX workflow websites on IIS 7

10 12 2010

Previously I have written up a post on how to run multiple workflow websites on the same server. The instructions are pretty IIS 6.0 specific, so here is an update on how to do this on IIS 7.

Step 1 – Create a new business connector configuration
1. Click start, control panel, administrative tools, Microsoft Dynamics AX 2009 Configuration.
2. Select Busines Connector from “Configuration Target”
3. Click Manage, Create Configuration.
4. Provide an intuitive name for the business connector configuration e.g. AX2009_DEV. You will need to use this in a few minutes again, so make a note of it.
5. Click ok.
6. Select Connection tab, select the AOS that is already there and click edit.
7.  Provide the correct server name, instance name and TCP/IP port, click ok.
8. Click apply to save your new configuration.
9. Select your previously selected configuration and click ok (this is so that your already existing website will still work).

Step 2 – Duplicate the website files
1. Open up My Computer and navigate to c:/Program Files/Microsoft Dynamics AX/50
2. Duplicate the Workflow folder  and rename the new folder to something intuative like “WorkflowDev”
3. Edit the web.config file inside the newly created folder using Notepad or similar text editor.
4. Replace the line “<appSettings/>” with

<appSettings>
<add key="BUSINESS_CONNECTOR_CONFIGURATION" value="[BUSINESS CONNECTOR NAME FROM STEP 1.4]" />
</appSettings>

5. Save and exit notepad

Step 3 – Create your website application pool
1. Open IIS Manager: Start, Control panel, Administrative Tools, Internet Information Services (IIS) Manager
2. Expand your server node, Click application pools.
3. Click add Application Pool (on the right)
4. Enter and Application pool name E.G. MicrosoftDynamicsAXWorkflow50Dev
5. Select .Net Framework v2.0.50727
6. Select Classic from the Managed pipeline mode.
7. Click ok to close.
8. Select your newly created application pool, click advanced settings.
9. Ensure that the managed Pipleine mode is set to classic.
10. Under Process Model -> Identity, click “…”, select custom account, click select, enter your bcproxy account details used for your previous workflow website. e.g. domain\bcproxy. Click ok to close, click ok to close the select window.
11.  Set the IdleTime-out (minutes) setting to 0.
12. Set Regular Time Inteval (minutes) (under Recycling section) to 0.
13. Click ok. Your application pool is now setup.

Step 4 – Create Application
1. In IIS Manager, expand the Sites node, expand “default website”
2. Right click on default website and click “Add Application”
3. Provide a name for your application e.g. MicrosoftDynamicsAXWorkflow50Dev
4. Select the application pool you created in step 3
5. Under the physical path node click … and browse to the folder you copied in step 2. e.g. C:/Program Files/Microsoft Dynamics AX/50/WorkflowDev, click ok
6. Ensure that your connect as settings are set to Pass-through authentication.
7. Click ok.

Step 5 – Select your website with AX.
1. In Dynamics AX 2009, naviagate to Administration -> Setup -> Workflow Infrastructure configuration wizard, under website select your new application that you created e.g. http://myserver:80/MicroftDynamicsAXWorkflow50Dev
2. Validate the website and complete the wizard.

You should now have multiple workflow websites running successfully in IIS 7.0

For more information on setting up your workflow infrastructure in dyanmics Ax 2009 check out this post.

Happy Daxing!


Security issues in assigning workflow items

25 11 2010

Recently I’ve been having some issues regarding security rights in workflow in Dynamics AX 2009. We keep on receiving the following error: Stopped (error): Work item could not be created. Insufficient rights for user [USERID].

After some investigation I found the code being executed that checks security when assigning workitems at SysWorkflowEventDispatcher::completeWorkItem() line 63. There are three checks done. But the two that I was interested in were the checks for 1. Menu Item access to the Workflow Document Menu Item specified on the approval/task AOT element and 2. Document access to the record in question.

I checked and confirmed that the user in question had sufficient rights for the Menu Item and Table, yet the workitem still refused to process, however once I gave the user full rights for the security keys to which the table and menu item belonged the workitem was able to assign correctly. E.g. The user had permissions to read and write to the PurchaseReqTable, but didn’t have full rights to the Security Key VendTables, once full rights were given on the security key all worked fine.

This is just my observation of the security and how it practically works out (see link to official documentation below), unfortunately this is not desirable behavior in workflow, as it reduces the security control available to administrators. I was able to overcome the menuitem issue by creating my own menuitem and assigning it a unique security key. However for the PurchReqTable I decided to leave the security as is because of other implications of changing it. If however you have your own custom table that you are working off, you would be able to assign a unique security key to it.

Happy Daxing.

Microsoft documentation on security in workflow : http://msdn.microsoft.com/en-us/library/cc641033.aspx