Customize your AX Workflow Email Templates

12 12 2012

A number of our clients have made requests of us to provide more meaningful information available on the Email notifications that are sent to the workflow work-item assignees. The typical information that they would like to see is line item information for workflow relating to Purchase Requisitions etc.

The easiest way is to modify the various task and step instructions in your workflow configuration. You can select tags relating to the lines such as %Purchase Requisition.Purchase requisition lines.ItemId% etc. These instructions can be displayed in your workflow email notification by including the %message% tag in your email template.

Screen Shot 2012-12-12 at 10.11.38 AM

However using this approach is not very flexible or visually appealing as each tag is replaced by a comma separated list of the values from the various lines. Most of our clients have required a more tabular format for the lines. My approach to solving their issue is by using a code based solution that I will describe below.

I’d like to say at the outset that the disadvantages to this approach is that it doesn’t easily allow for multi-language, its fairly rigid, and it is a more hard-coded solution making it not very flexible.

Step 1. Create a method ‘wfDescription’.

Create a ‘wfDescription’ method on each Workflow Document table that you are using. This method should return an block of html (or plain text) with the content that you would like to display for the given document type. E.G. For a purchase requisition add the following method to the PurchReqTable table.

str wfDescription() 
{
 PurchReqLine line;
 str ret="";
 ;
 ret = ret + strfmt("<strong>Motivation: </strong>%1<br/>", this.businessJustification()); ret = ret + "<strong>Lines:</strong><br/>";
 while select line where line.PurchReqId==this.PurchReqId
 {
   ret = ret + strfmt("%1. %2 <span style='color: #009966'> (%3 @ %4 %5) - %6</span><br/>",num2str(line.LineNum,0,0,1,3), line.itemName(), line.PurchQty, line.CurrencyCode, line.PurchPrice, line.LedgerAccount);
 }
 return ret;
}

Step 2: Add a description tag to your email template

Open up your email template and place a %documentdescription% tag in the place where you would like the text/html block from Step 1 to appear in your emails.

Step 3: Enable the %documentdescription% tage

This is the key step in the whole process. To enable workflow to replace the new %documentdescription% tag created in Step2 with the contents from the method in Step 1. To do this we will be customizing the ‘EventNotificationWorkflow’ class:

  • Open the ‘EventNotificationWorkflow’ class.
  • Edit the sendMail method.
  • Add the line ‘this.addCustomMergeValues();’ after the line ‘this.addBaseMergeValues();’
  • Create a new method named ‘private void addCustomMergeValues()’ to the ‘EventNotificationWorkflow’ class.
    This method will determine whether the workflow document has the ‘wfDescription’ method and will replace the tag with what the method returns.
private void addCustomMergeValues2()
{
  SysDictTable dictTable; 
  str description;
  ;
  dictTable = new SysDictTable(tablenum(PurchReqTable));

  if (dictTable.isMethodActual('wfDescription'))
  {
     description = dictTable.callObject('wfDescription',record);
  }
  else
  {
    description = "";
  }
  mergeValues.insert("documentdescription", description);
}

The final step is to prevent the html from your return method from being escaped. To do so:

  • Open up the SysEmailTable (Table) in the AOT
  • edit the HTMLEncodeParameters method
  • Add a conditional statement before the line ‘encodedMap.insert(mapEnum.currentKey(), SysEmailTable::htmlEncode(mapEnum.currentValue()));’ so that your new tag %documentdescription% is not html encoded.
if (mapEnum.currentKey() == 'documentdescription')
    encodedMap.insert(mapEnum.currentKey(), mapEnum.currentValue());
else 
    encodedMap.insert(mapEnum.currentKey(), SysEmailTable::htmlEncode(mapEnum.currentValue()));

If all goes well you should now receive more detailed information in your email notification.
Let me know if you have any better ways of accomplishing this or comments on my solution.

Happy daxing.


Assign Workitems based on document field

28 11 2012

I received a query yesterday from a reader asking how one could go about assigning approval work items to different users based on specific fields in the source document. There are a couple of approaches that you could use. The first approach that I will discuss today is ideal to use in the following circumstances.

  1. You do not wish to perform any development.
  2. There are not too many combinations available. E.G. Assign all blanket Purchase orders to person X and all the rest to person Y.

If you are using AX 2012, you can do the following:

  1. Create a new workflow configuration from whichever template you are basing your workflow configuration off.
  2. Drag and drop a conditional decision node into your workflow configuration to split your workflow into multiple paths.
  3. Configure your conditional decision by clicking properties. Then setup a condition E.G. Where Ledger Journal Table.Account Type is value Ledger
  4. Close the conditional decision properties.
  5. Drag and drop two of your approval/task nodes to the workflow structure.
  6. Connect the true side of your conditional statement to the one and the false side to the other.
  7. Configure your approval nodes.
    1. Double click on the node connected to your True leg of the conditional statement select Step 1, click the assignment button.
    2. Select “User” under the “Assignment Type” tab.
    3. Select the User / Users who should be assigned the workitem if your condition is met.
    4. Setup your workflow messages for the step.
    5. Return to your workflow canvas and perform step 1-4 for the false leg of your conditional decision, selecting the relevant user to whom the workitem should be sent to if the conditional decision is not met.
  8. Should you have more than two options, you can chain multiple conditional decisions to either the true or false leg of your original decision.

Here is a short video tutorial for the above making use of AX2012 and the Vendor Disbursement Journal Workflow. I’d recommend watching it in HD.

As an alternate to the above approach, or if you are using AX2009, you can also make use of multiple steps within a single approval. (This example is using AX2012, but a similar path is followed with AX2009)

  1. Create a workflow configuration with an approval node.
  2. Double click on your approval node
  3. Click on Step1, click the Condition button.
  4. Select the “Run this step only when the following conditions are met.”
  5. Create a condition.
  6. Select the Assignment option on the left of your screen.
  7. Select “User” on Assignment type
  8. Select the User / Users who should be assigned the workitem if your condition is met.
  9. Close Step1’s properties.
  10. Drag and drop a new step from your tool box into the process flow and repeat step 1-9 for each of the conditions required.
  11. Ensure that all possibilities are met.

Here is a short video tutorial for the above making use of AX2012 and the Vendor Disbursement Journal Workflow  I’d recommend watching it in HD.


Approve Workflow Items Via Email

7 05 2012

This is now officially my 100th post to my Dynamics AX Workflow Wanderings blog and I thought I would take the opportunity to present a fantastic little add on product for workflow that our company has been using extensively with our various clients.

The product provides Dynamics AX users the ability to approve Dynamics AX 2009 work items from any email client regardless of operating system or mobile platform. This means that you can use it from Blackberry, iPhone, iPad, Outlook, Apple Mac etc… Its as easy as sending email. Whats more is it doesn’t require any form of app to be installed on users devices, it just works!

Some of the features/advantages

  • Easy and quick to setup in Dynamics AX. It can be setup in a very short space of time, which means no expensive installation costs.
  • There are no complex inter app communications, webservices or network configurations that need to be done as its all handled in AX. Simply install the provided XPO and DLLs, setup your email account information and activate a batch job.
  • Detailed processing information available, to help track how users are interacting with the system
  • Resend email notification functionality
  • Add comments history to email templates.
  • Lower load on your system as users to not have to login to approve every workitem.
  • Quicker turn around time on workflows as workitems can be approved from anywhere.
  • Asynchronous approvals.

How do I get it?

  • We’ve tried to make it super easy to get hold of this product, so you can visit http://merpi.axnosis.com/emailer.php and click on the buy button to purchase it immediately via Paypal.
  • If you prefer the old fashioned route you can mail us on mobile@axnosis.com for a formal quote, demo or anything else you require.


Stopped (error): Failed to find workflow instance. Failed to find workflow instance.

4 05 2012

We recently recently came across an issue at a client site where workflows instances would be completed but the status would be “Stopped (error)” with error messages saying “Failed to find workflow instance. Failed to find workflow instance. Failed to find workflow instance. Failed to find workflow instance” after investigating the issue for quite a while and not finding a solution I eventually found a post at “Peng’s Dynamics AX” Blog where he listed a hotfix that Microsoft released to resolve this bug. The knowledge base article for KB2398999 and download link can be found at: http://support.microsoft.com/hotfix/KBHotfix.aspx?kbnum=2398999&kbln=en-us&sd=mbs#step2

Thanks to Peng for reporting this issue to Microsoft and following up with them for a year! You can view the original blog post here.


Resource Page for Known issues in AX2009 Workflow

3 05 2012

Recently came across this blog page with a list of workflow resources including hotfixes videos etc…

https://community.dynamics.com/product/ax/axtechnical/b/axresources/archive/2012/02/13/resource-page-for-workflow-in-microsoft-dynamics-ax-2009.aspx


What happened to the Workflow History Form in AX 2012?

3 05 2012

If you’ve stated to use workflow in AX2012 you’ve probably noticed that the workflow history from is no longer where it used to be. Previously in AX2009 it was available under Basic -> Enquires -> Workflow History.

You can now find the workflow History Form in AX 2012 under Home -> Enquiries -> Workflow -> Workflow History.


Setting up notifications on Approvals

11 04 2012

Yesterday i received a query from a client on how to setup a notification so that the person who submits a document to workflow gets notified once it had been approved. I quickly recorded the following screencast. I recommend watching it in high quality otherwise everything is a bit small.


Code upgrade whitepapers for AX 2012

23 02 2012

For those of you upgrading AX 2009 code to AX2012, Microsoft has provided an impressive set of upgrade white papers describing the changes in the various functional areas of AX. Practical examples of how you as a developer can adapt your code to fit in with the new way of doing things are provided at every turn.

These papers include how to adapt to changes to the Inventory Dimensions, InventTrans Table, Eventing functionality, Addressbook framework, budget control (commitment accounting framework) etc..
These are all a must read before starting upgrade projects.

You can download all the papers over here. http://technet.microsoft.com/en-us/Library/hh272866.aspx


Workflow history error – Stopped (error): Could not find user

10 02 2012

If you have ever coded with the WorkflowParticipant provider class you may have come across the following stop error in workflow history “Stopped (error): Could not find user”. After spending a couple of hours tracing through code I eventually located the cause of the error.

In my case the participant provider class is supposed to retrieve an employeeId from a form and translate it to a userID which it  then returns in the WorkflowUserList. However in my case no user relation had been setup between the employee and the user thus the class ended up adding an empty user to the list causing the SysWorkflowProviderService::resolveDueDateAsUser  method to fail as there it couldnt find the blank user. Thus:

Resolution:
1. Always check the user id’s that you are adding to WorkflowUserList that your provider returns, to ensure that they are not empty.

E.G: Wrong:

userList.add(SysCompanyUserInfo::emplId2UserId(resp);

Right:

respUser = SysCompanyUserInfo::emplId2UserId(resp); 
if (respUser == '') { 
    throw error(strfmt("No user relationship defined for employee %1",resp)); 
} 
userList.add(respUser);


Cancel Workflow – The Process

1 02 2012

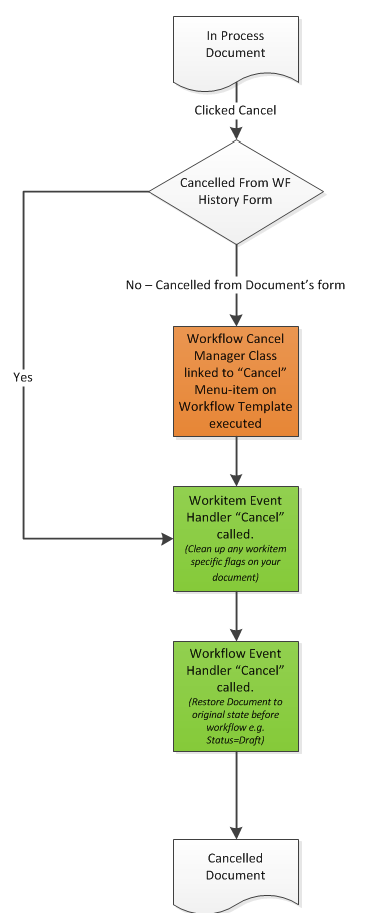
I always think better with diagrams, so I quickly drew up this diagram on when code gets executed after a user has clicked the “Cancel” button on either the workflow history form or the document’s (e.g. PurchReq) form. This helps me to know how to clean up my document on cancellation, by placing the code in the correct place.

Process that occurs when workflow is cancelled

Cancel Workflow Process

Look out for a more detailed document on the rest of workflow in the next few weeks.