Determine if a document has an outstanding task.

20 05 2015

In AX2009 you used to have two different status for assigned Purchase Requisitions in workflow, namely: “Pending Completion” and “Pending Approval”. Unfortunately in AX2012 this has become simply “In Review” to signify it being in workflow. This allows a more flexible approach to the ordering and reuse of elements in workflow. However it does not provide a clear way to distinguish where the Purchase Requisition is currently in the workflow process especially whether or not the item is currently assigned as a task or an approval.

The code below provides the X++ select statement to determine whether a document in workflow has at least one pending Task based workitem linked to it.

public display NoYes isTask()
{
  WorkflowWorkItemTable workflowWorkItemTable;
  WorkflowElementTable workflowElementTable;
  select firstonly ElementId from workflowWorkItemTable
    where workflowWorkItemTable.RefTableId == this.TableId &&
    workflowWorkItemTable.RefRecId == this.RecId &&
    workflowWorkItemTable.Status == WorkflowWorkItemStatus::Pending
    join ElementId, ElementType from workflowElementTable
    where workflowElementTable.ElementId == workflowWorkItemTable.ElementId &&
    workflowElementTable.ElementType == WorkflowElementType::Task;
  return (workflowWorkItemTable.RecId == 0) ? NoYes::No : NoYes::Yes;
}

Note: If you’re using line level workflows or parallel branches you may not be guaranteed that the result is what you are logically looking for. It will simply return if there is at least one pending task workitem linked.

This post was inspired by forum question: https://community.dynamics.com/ax/f/33/t/161105


Assign Workitems based on document field

28 11 2012

I received a query yesterday from a reader asking how one could go about assigning approval work items to different users based on specific fields in the source document. There are a couple of approaches that you could use. The first approach that I will discuss today is ideal to use in the following circumstances.

  1. You do not wish to perform any development.
  2. There are not too many combinations available. E.G. Assign all blanket Purchase orders to person X and all the rest to person Y.

If you are using AX 2012, you can do the following:

  1. Create a new workflow configuration from whichever template you are basing your workflow configuration off.
  2. Drag and drop a conditional decision node into your workflow configuration to split your workflow into multiple paths.
  3. Configure your conditional decision by clicking properties. Then setup a condition E.G. Where Ledger Journal Table.Account Type is value Ledger
  4. Close the conditional decision properties.
  5. Drag and drop two of your approval/task nodes to the workflow structure.
  6. Connect the true side of your conditional statement to the one and the false side to the other.
  7. Configure your approval nodes.
    1. Double click on the node connected to your True leg of the conditional statement select Step 1, click the assignment button.
    2. Select “User” under the “Assignment Type” tab.
    3. Select the User / Users who should be assigned the workitem if your condition is met.
    4. Setup your workflow messages for the step.
    5. Return to your workflow canvas and perform step 1-4 for the false leg of your conditional decision, selecting the relevant user to whom the workitem should be sent to if the conditional decision is not met.
  8. Should you have more than two options, you can chain multiple conditional decisions to either the true or false leg of your original decision.

Here is a short video tutorial for the above making use of AX2012 and the Vendor Disbursement Journal Workflow. I’d recommend watching it in HD.

As an alternate to the above approach, or if you are using AX2009, you can also make use of multiple steps within a single approval. (This example is using AX2012, but a similar path is followed with AX2009)

  1. Create a workflow configuration with an approval node.
  2. Double click on your approval node
  3. Click on Step1, click the Condition button.
  4. Select the “Run this step only when the following conditions are met.”
  5. Create a condition.
  6. Select the Assignment option on the left of your screen.
  7. Select “User” on Assignment type
  8. Select the User / Users who should be assigned the workitem if your condition is met.
  9. Close Step1’s properties.
  10. Drag and drop a new step from your tool box into the process flow and repeat step 1-9 for each of the conditions required.
  11. Ensure that all possibilities are met.

Here is a short video tutorial for the above making use of AX2012 and the Vendor Disbursement Journal Workflow  I’d recommend watching it in HD.


X++ Exception: Workitem could not be created.

2 05 2012

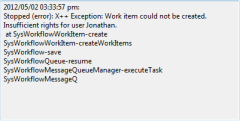
I have been doing some tests with a new custom workflow and came across the following scenario. (Note: this describes a solution to one of the many issues that may cause this error message)

I developed a custom workflow and its setup its corresponding configuration, I was able to submit and everything but ended up getting the following error in my workflow history when the workflow system tried to assign a workitem to me:

Stopped (error): X++ Exception: Work item could not be created. 
Insufficient rights for user Jonathan.
 at SysWorkflowWorkItem-create 
SysWorkflowWorkItem-createWorkItems 
SysWorkflow-save SysWorkflowQueue-resume 
SysWorkflowMessageQueueManager-executeTask 
SysWorkflowMessageQ

After exploring for a while I found an additional line on my batch server’s event log stating “X++ Exception: The workflow system could not access the business document data. Report this issue to your system administrator.” which once can trace back to line 68 of the SysWorkflowDocument.assertAsUser method.

I reviewed the query linked to my workflow document of my custom template and realized that one of the links or ranges caused no records to be returned, ever. Fixing the query and resuming my workflow caused the workitem to process correctly.

Unfortunately this error message was a bit cryptic for the actual issue at hand, but I hope this will help someone who runs into the same issue in the future.


Workflow history error – Stopped (error): Could not find user

10 02 2012

If you have ever coded with the WorkflowParticipant provider class you may have come across the following stop error in workflow history “Stopped (error): Could not find user”. After spending a couple of hours tracing through code I eventually located the cause of the error.

In my case the participant provider class is supposed to retrieve an employeeId from a form and translate it to a userID which it  then returns in the WorkflowUserList. However in my case no user relation had been setup between the employee and the user thus the class ended up adding an empty user to the list causing the SysWorkflowProviderService::resolveDueDateAsUser  method to fail as there it couldnt find the blank user. Thus:

Resolution:
1. Always check the user id’s that you are adding to WorkflowUserList that your provider returns, to ensure that they are not empty.

E.G: Wrong:

userList.add(SysCompanyUserInfo::emplId2UserId(resp);

Right:

respUser = SysCompanyUserInfo::emplId2UserId(resp); 
if (respUser == '') { 
    throw error(strfmt("No user relationship defined for employee %1",resp)); 
} 
userList.add(respUser);


Why does my Submit button keep showing?

9 05 2011

Sometimes when developing a new workflow or customizing an existing one, I will be able to submit a record into workflow and it seems to be processed (history shows workitems being created etc), however when the person who needs to approve it trys to access it all he gets is a submit button, no actions, history etc…

This is normally a result of incorrectly implementing your canSubmitToWorkflow method on your form. You need to make sure that this method returns FALSE if the record is being processed and true if it is available for submission.

e.g.
if (purchReq.Status == PurchReqStatus::Draft) return true;
else return false;

I hope this quickfix helps somebody. The topic recently came up on the ax yahoo group and I’ve reposted in case it is helpful.


Business Connector code refresh

15 04 2011

While developing business connector applications you may come across issues where you code changes in AX do not seem to be taking effect or the caching is taking too long to refresh. I’ve tried restarting the AOS, restarting IIS, restarting Application pools even restarting the entire server and nothing seemed to have helped. However, an easy way to ensure that your changes are always available to the business connector code is to add the following line at the beginning of your .NET code, after loggin in, but before executing your custom code:
DynAx.CallStaticClassMethod(“SysFlushAOD”, “doFlush”);

(where DynAx is a logged in instance of Microsoft.Dynamics.BusinessConnectorNet.Axapta)

I hope that helps someone.


Workflow iPhone Application

8 11 2010

Hi all.

Today’s post is hopefully going to be a little different from all the normal posts that I have here at workflowax. I am very excited to post a short demo of some R&D I have been doing for workflow in AX. It all started when I first got an iPhone about a year ago now and was blown away by both the simplicity of the interface and the amazing smoothness of use (much credit to the capacitive touch screen). The iPhone really got my mind thinking about how I could apply this to the area of ERP, AX and workflow in specific. So recently I got exploring how to do development on iphones and as a proof of concept decided to create a workflow approver for Dynamics AX 2009.

The basic idea is for users to be able to have an email like list of all current workitems posted for their attention. They should then have all the necessary information to make an informed decision about what action to take and then perform the necessary action. All of this should be able to function off the current workflow framework, configurations etc… provided in Dynamics AX without any modifications.

The result: an amazingly simple and easy to use mobile workflow approver. Here’s a short screen cast of how the application functions. (i’ve used the iPhone emulator on mac to make the screencast easier)

As always please post your thoughts or comments below!

Happy Daxing.

Update: some screenshots of the application:

Workflow History


Workflow Wishlist #2 – onDelegateEvent

5 10 2010

Wish:
The second item on my wishlist for Dynamics AX workflow is to have an “onDelegateEventHandler” option available for tasks and approvals. I must admit that this would most probably not be a very widely used function within AX workflow, but here is why I would like to have one.

Given the way that workflow manages the assignment of workitems, there is no way of determining when and to whom tasks are assigned to people, in order to perform some type of custom action like updating an external system or table. Even making use of custom ParticipantProviders, one does not have a guarantee that it will end up at the person that your provider class is returning, due to delegation settings.

Thus an onDelegate event handler would be very useful. Unfortunately workflow does not have any eventhandlers for individual workitems, rather just set on tasks, so this may be difficult to accomplish.

My workaround:
It is relatively easy to tap into the WorkflowTrackingTable’s (Table) saveTracking Method and kick off some custom action using the record ‘trackingTable’. The trackingTable record contains a useful field  called TrackingType (enum WorkflowTrackingType) which can provide you with more informations as to what has just occurred. E.g. WorkflowTrackingType::Delegate, WorkflowTrackingType::EscalationPath, WorkflowTrackingType::Creation. Using this you can then perform whatever action you would like to do e.g.

if (trackingTable.TrackingContext == WorkflowTrackingContext::WorkItem)
{
  if (trackingTable.TrackingType == WorkflowTrackingType::Creation)
  {
        doAction(trackingTable.User); //this is the user to whom the workitem has finally been assigned 
  }
  else if ((trackinTable.TrackingType == WorkflowTrackingType::Delegation) || (trackingTable.TrackingType == WorkflowTrackingType::EscalationPath))
  {
       doAction(trackingTable.ToUser); //to whom the workitem is now assigned (delegated/escalated)
  }
}
N.B. Be warned, you are modifying system classes so be careful when you are installing new hotfixes or upgrading.
Happy Daxing
Comments Suggestions?


Workflow Wishlist #3

4 10 2010

The item sitting at number 3 of my workflow wishlist is to have the canSubmitToWorkflow logic, that currently resides as a method on your workflow enabled forms, sit within workflow configurations or within a class linked to your workflow template. It seems strange to me that almost all the logic and complexity of the workflow sits in nicely packaged/distinct bundles  i.e. templates and configurations, except for this one method. I would ideally like to be able to install a new template at a client site and without modifying the form, already have my canSubmit logic active.

Workflow does provide activation conditions per configuration, but my success using these has been fairly limited.

My workaround:
I have the habit of creating a static canSubmit method on all my WorkflowActionManager classes  (i.e. per template) which I call from the canSubmitToWorkflow method on the form, this way it keeps the code fairly separate. The drawback is still that i cannot have different logic being performed if I have multiple configurations setup.

Please post any comments as to whether you have experienced similar issues or if you agree/disagree with me in this wish.

Happy daxing.


Workflow Wishlist:


Adding custom fields to workflow emails

26 08 2010

Hi all.
For today we are going to be taking a quick look at one of the ways in which you can add custom tags to your workflow emails. For example by default one does not have the option to display the name of the user whom the work item has been assigned to, but you may want to start out your email saying “Dear %assignedToName%” and have AX automatically populate this for you. One of the simplest ways to accomplish this is by customizing the EventNotificationWorkflow class. (Note: This is a framework class so be careful when upgrading).

Step 1 – Add a new method such as “void addCustomMergeValues()”
Step 2 – Add as the new tags that you would like to access by using the following format mergeValues.insert(“field1″,”myValue”); – in this case putting the tag %field1% in your email template, you final emails that are send out would be populated with “myValue”.
Step 3 – Call you custom method from the “sendMail” method of EventNotificationWorkflow. The best place to put this call would be directly below “this.addBaseMergeValues();” (line 25).

After doing this you should be able to freely use all your new tags in you email templates. Here is my example of how to insert the notification owner’s name into your template.

void addCustomMergeValues()
{
UserInfo user;
;
select user where user.Id==inbox.UserId;
mergeValues.insert('assignedToName',user.name);
}

Note: You can also add custom values from the record that the notification is for, by making use of global variable “record” available in EventNotification e.g.

if (record.TableId == purchTable.TableId)
{
    purchTable.data(record);
   mergeValues.insert("docKey",purchTable.PurchId)
} else if (record.TableId = purchReq.TableId)
{ 
   purchReq.data(record);
   mergeValues.insert("docKey",purchReq.PurchReqId");
}

Happy Daxing