Workflow Configuration Displays Error Icon despite being valid

13 02 2018

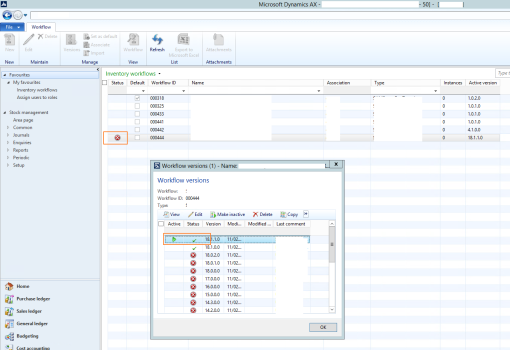
I’ve recently found a scenario where my workflow configuration has an “invalid” icon next to the workflow configuration, this all despite the latest version being fully validated.

unnamed.png

Tracing back the issue it seems that Microsoft displays the “valid/invalid” icon based on the latest workflow version sorted by workflow version “RecId” (See Table: WorkflowTable.validIcon).

So searching the workflow version Table I found an old invalid workflow configuration version (based on modifiedDateTime) that has an out of sync (i.e. newer) RecId than the actual newest versions. Deleting this record resolved the issue.

There should be no issues deleting this invalid version as actual workflow instances can’t be created against invalid versions.

I think the way the icons are displayed is a bug in AX, but so far doesn’t appear to affect too much.


Workflow Types in AX 2012

22 01 2015

Looking for a list of Workflow Types (Templates) available in AX 2012: https://technet.microsoft.com/en-us/library/dd362043.aspx


Mass Resume Line Workflows

14 11 2014

Orginally from my new blog: www.exploreax.com

http://www.exploreax.com/blog/blog/2014/11/07/mass-resume-line-workflows/

<strong>Challenge/Problem</strong>: Many line level workflows that need to be resumed.

<strong>Description</strong>: Sometimes due to data or setups one may have numerous line level workflows failing and entering a “Stopped” state. This may be a result of calendars that do not have enough dates created, users who have been disabled etc… If the workflows were header level, it is easy enough to select all in the Workflow History form and click resume, however on line level workflows one needs to view each line level workflow individually and resume them.

<strong>Solution</strong>: The following job can be used to perform mass resume on stopped workflows. You can adapt the SQL to limit to certain documents or document types of necessary.
<pre>static void resumeStoppedWorkflows(Args _args)
{
WorkflowTrackinStatusTable tracking;
int i, j;
while select tracking where tracking.TrackingStatus == WorkflowTrackingStatus::Faulted
&amp;&amp; tracking.WorkflowType == WorkflowTrackingStatusWorkflowType::DependentSubworkflow
{
try {
Workflow::resumeWorkflow(tracking.CorrelationId, “Auto-resumed”);
i++;
}
catch (Exception::Error)
{
//Some may not be able to be resumed but we dont want to stop the process
j++
}
}
info(strfmt(“%1 workflows resumed, %2 workflows could not be resumed”));
}
</pre>


Deleting a workflow Instance in Microsoft Dynamics AX 2012

22 05 2014

Deleting a workflow Instance in Microsoft Dynamics AX 2012

I’ve been wanting to write a tutorial explaining the tables involved in a workflow and how to delete an instance if necessary (e.g. when a major fault or data inconsistency occurs), however it seems Colin’s Dynamics AX 2012 blog beat me to it and he did a superb job at that, check it out here


AX2012 – On Reassign: Failed to create a session

23 01 2014

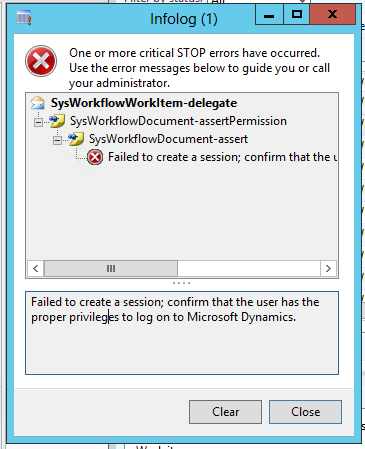
When trying to reassign a record via workflow history in AX2012 we received the error: Failed to create session; confirm that the user has the proper privileges to log in to Microsoft Dynamics.

Screen Shot 2014-01-23 at 2.31.28 PM

The cause of our problem was a faulty CIL. We performed a full CIL compile, restarted AX and then were then able to perform the re-assign


Subworkflow Tutorial

13 01 2014

Since the launch of Dynamics AX 2012 I’ve been amazed at the amount of really good blogs that have started springing up. One such blog is Collin’s Dynamics AX2012 blog. After finding a whole load of question on Subworkflows in Dynamics AX, I considered writing up an article, but found a his tutorial very way more helpful than I could ever be, so please pay his site a visit!

Collin’s Dynamics AX2012 Blog – Subworkflows


JSON in Dynamics AX – Advanced example #1 (Basic Auth)

11 11 2013

After my previous post on using JSON in Dynamics AX2012 I have received a number of requests for some slightly more advanced examples. I will attempt over the next couple of weeks to provide some.

Today I will cover the use of Basic http authentication. There are a couple of non-intuitive tricks that one needs to use to get it to work.
Before performing any direct requests as per our previous example you will need to make some modifications to the headers in your RetailRequestWeb object.

The first header modification is to add the “Authorization: Basic ” header. You can do so by building up the header string as follows

System.Text.Encoding ascii;
str credentials;
credentials = "myusername:mypassword";
//N.B. Encode the credentials before adding them to your headers otherwise you will receive 403 unauthorized errors
ascii = System.Text.Encoding::get_ASCII();
credentials = System.Convert::ToBase64String(ascii.GetBytes(credentials));
//Combine header instruction and encoded credentials
request.parmHeader("Authorization: Basic "+credentials);

The second modification you need to make is set the request content type to “application/json” without this you may receive 403 unauthorized errors. The retails API allows you to set the content type easily by using the parmContentType method on your RetailRequestWeb object.

request.parmContentType("application/json");

Finally the full example of constructing your json request ready for use:

RetailWebRequest request;
System.Text.Encoding ascii;
str credentials;

request = RetailWebRequest::newUrl(_url);
credentials = "myusername:mypassword";
ascii = System.Text.Encoding::get_ASCII();
credentials = System.Convert::ToBase64String(ascii.GetBytes(credentials));
request.parmHeader("Authorization: Basic "+credentials);
request.parmContentType("application/json");


Using JSON in Dynamics AX

22 10 2013

I’ve recently had a requirement to integrate an external system (Toggl http://www.toggl.com) with Dynamics AX 2012’s Timesheet system. However the external system only provided a JSON API which isn’t supported natively by the Dynamics AX AIF system.  After some research and trial and error (using various DLL’s) I eventually stumbled across some really useful classes provided by the Retail module in Dynamics AX2012. These classes (although named “Retail…”) provide a really easy and elegant JSON interaction for any use. Here is a very basic code sample of how to consume JSON using these classes in Dynamics AX 2012.


static void myJob(Args _args)
{ 
    RetailWebRequest request; 
    RetailWebResponse response; 
    str rawResponse, value; 
    Map data; 
    RetailCommonWebAPI webApi = RetailCommonWebAPI::construct(); 
    request = RetailWebRequest::newUrl("http://mysite.com/jsonaction"); 
    response = webApi.getResponse(request); 
    rawResponse = response.parmData(); 
    data = RetailCommonWebAPI::getMapFromJsonString(rawResponse); 
    value = data.lookup("elementname"); 
    info(strFmt("Element name: %1",value)); 
}

If you are interested in some more advanced examples of using JSON in AX (e.g. using authentication, retrieving subsets of info or arrays)  or doing some of your own integration into Toggl timekeeping please let me know and I’ll post some more info.


Upcoming AX2012 Workflow Apps and Features

10 04 2013

I was recently pointed to this video http://www.youtube.com/watch?feature=player_embedded&v=UJpCe_7sk0k from msdyncomm highlighting some very cool upcoming features for workflow in Dynamics AX 2012. I reviewed it this morning and was very encouraged to see the direction that workflow is going in. Workflow should make users lives simpler and more streamlined and the features highlighted will certainly go a long way in accomplishing this goal.


Customize your AX Workflow Email Templates

12 12 2012

A number of our clients have made requests of us to provide more meaningful information available on the Email notifications that are sent to the workflow work-item assignees. The typical information that they would like to see is line item information for workflow relating to Purchase Requisitions etc.

The easiest way is to modify the various task and step instructions in your workflow configuration. You can select tags relating to the lines such as %Purchase Requisition.Purchase requisition lines.ItemId% etc. These instructions can be displayed in your workflow email notification by including the %message% tag in your email template.

Screen Shot 2012-12-12 at 10.11.38 AM

However using this approach is not very flexible or visually appealing as each tag is replaced by a comma separated list of the values from the various lines. Most of our clients have required a more tabular format for the lines. My approach to solving their issue is by using a code based solution that I will describe below.

I’d like to say at the outset that the disadvantages to this approach is that it doesn’t easily allow for multi-language, its fairly rigid, and it is a more hard-coded solution making it not very flexible.

Step 1. Create a method ‘wfDescription’.

Create a ‘wfDescription’ method on each Workflow Document table that you are using. This method should return an block of html (or plain text) with the content that you would like to display for the given document type. E.G. For a purchase requisition add the following method to the PurchReqTable table.

str wfDescription() 
{
 PurchReqLine line;
 str ret="";
 ;
 ret = ret + strfmt("<strong>Motivation: </strong>%1<br/>", this.businessJustification()); ret = ret + "<strong>Lines:</strong><br/>";
 while select line where line.PurchReqId==this.PurchReqId
 {
   ret = ret + strfmt("%1. %2 <span style='color: #009966'> (%3 @ %4 %5) - %6</span><br/>",num2str(line.LineNum,0,0,1,3), line.itemName(), line.PurchQty, line.CurrencyCode, line.PurchPrice, line.LedgerAccount);
 }
 return ret;
}

Step 2: Add a description tag to your email template

Open up your email template and place a %documentdescription% tag in the place where you would like the text/html block from Step 1 to appear in your emails.

Step 3: Enable the %documentdescription% tage

This is the key step in the whole process. To enable workflow to replace the new %documentdescription% tag created in Step2 with the contents from the method in Step 1. To do this we will be customizing the ‘EventNotificationWorkflow’ class:

  • Open the ‘EventNotificationWorkflow’ class.
  • Edit the sendMail method.
  • Add the line ‘this.addCustomMergeValues();’ after the line ‘this.addBaseMergeValues();’
  • Create a new method named ‘private void addCustomMergeValues()’ to the ‘EventNotificationWorkflow’ class.
    This method will determine whether the workflow document has the ‘wfDescription’ method and will replace the tag with what the method returns.
private void addCustomMergeValues2()
{
  SysDictTable dictTable; 
  str description;
  ;
  dictTable = new SysDictTable(tablenum(PurchReqTable));

  if (dictTable.isMethodActual('wfDescription'))
  {
     description = dictTable.callObject('wfDescription',record);
  }
  else
  {
    description = "";
  }
  mergeValues.insert("documentdescription", description);
}

The final step is to prevent the html from your return method from being escaped. To do so:

  • Open up the SysEmailTable (Table) in the AOT
  • edit the HTMLEncodeParameters method
  • Add a conditional statement before the line ‘encodedMap.insert(mapEnum.currentKey(), SysEmailTable::htmlEncode(mapEnum.currentValue()));’ so that your new tag %documentdescription% is not html encoded.
if (mapEnum.currentKey() == 'documentdescription')
    encodedMap.insert(mapEnum.currentKey(), mapEnum.currentValue());
else 
    encodedMap.insert(mapEnum.currentKey(), SysEmailTable::htmlEncode(mapEnum.currentValue()));

If all goes well you should now receive more detailed information in your email notification.
Let me know if you have any better ways of accomplishing this or comments on my solution.

Happy daxing.